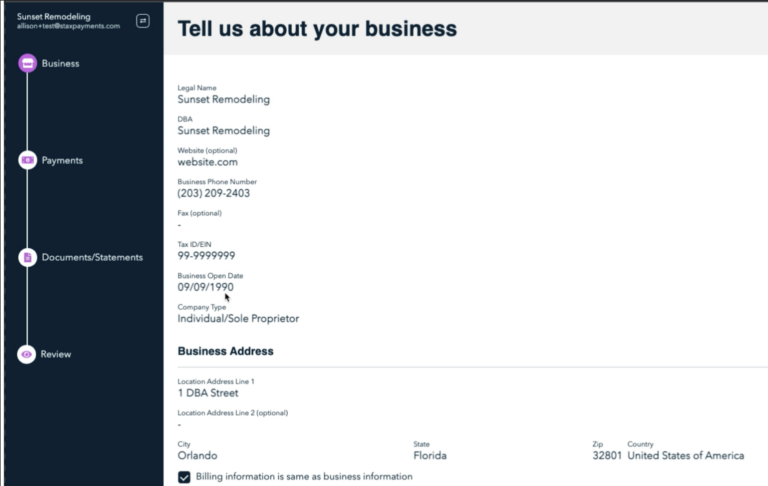
Stax Hosted Enrollment
A Stax Hosted or Hybrid enrollment approach allows you to onboard and enroll your merchants with limited involvement. The balanced enrollment flow enables you to automate the payment enrollment process with Stax without implementing a Full API-driven enrollment. This method provides a tightly integrated experience for your merchants with minimal development investment.
Prerequisite
You will need to acquire your Partner Level Enrollment Key.
Step 1: Enroll the merchant account with Stax
Using your preferred API program, enter the Enroll a Merchant call.
POST /admin/enrollUsing the Partner Level API Key, the custom pricing plan(s), and plan values for your brand, this API will create a merchant, merchant registration, user for Stax Pay, and an Ephemeral Token which can be used to SSO(Single sign-on) your user into Stax Pay’s Registration Pages.
Save the merchant.id and authorization token (auth_token) from the response.
Step 2: Correlate the merchant in Stax to the business in the ISV software
Add the merchant.id saved from step 1 to the appropriate sub-merchant.
Step 3: Redirect merchant to Stax Sign-up Pages using Single Sign On (SSO)
Using the user’s auth_token, you can redirect the user to Stax’s registration/sign-up page to finish the application. The auth token allows you, the ISV, to sign your merchant’s users into the Stax Sign-up pages. The following URL is where you will send the user. See our SSO docs for more information.
https://signup.staxpayments.com/#/sso?jwt[]=AUTH_TOKEN
where AUTH_TOKEN is the token acquired in step 1.
Note: The authorization token expires after 96 hours. If the token has expired, either the ISV application can generate a new auth token by using the Generate an Ephemeral Token API for the user, or the merchant will need to login to the sign up page https://signup.staxpayments.com with their username and password.
Step 4: Create the merchant API key
Use the merchant.id and create an API key for the sub-merchant to process payments with Stax:
POST merchant/{id}/api_keyRecord the API key from the response and associate it with the sub-merchant in the ISV platform.
Note: Merchants still must wait for the merchant account to be approved and fully underwritten before they may begin processing payments using this API key.
Step 5: Verifying the merchant application
The merchant must complete and sign the application before the underwriting team can begin reviewing the application.
Merchants may abandon their forms to retrieve required business information they may not know off-hand (such as TIN or banking information). It is essential to recognize when an application has been abandoned after a designated period. You may need to communicate with the merchant to encourage them to complete the signing process.
You can determine whether the merchant has signed by using the Get Merchant Registration Data API resource and checking for the timestamp in the electronic signature field (electronic_signature.timestamp).
The merchant has not completed their application until this field is populated with a timestamp. You may poll for this information every 30 minutes to an hour and then trigger an event, such as an email, to notify the merchant that they should finish their application. Merchants who have not signed may be contacted directly to see if you can assist them with completing their application.
Note: If you have the update_electronic_signature webhook enabled, you will be notified each time the application is signed or re-signed, so you can understand that your merchant has reached the signature step of the enrollment process. Refer to our Webhook Documentation for instructions on setting up the webhook.
Step 6: Check the merchant’s underwriting status
Once the merchant has finished signing the application and the electronic_signature.timestamp has been populated, you can poll the merchant’s registration to understand the underwriting status.
To check the underwriting status, complete the following command:
GET /merchant/{id}/registration.underwriting_statusYou can also use registration.underwriting_substatuses or registration.underwriting_note for further details.
For additional information, see the Get Merchant Registration Data API resource.
Example
If the Underwriting gets PENDED (underwriting_status: “PENDED”, the underwriting_note will reflect the information that needs to be updated. In these cases, you should offer the user a way to return to the Signup pages via a link to https://signup.staxpayments.com/#/application/review to make updates.
Note: You can use the merchant’s merchant-level API key(From step 4 above) to subscribe to a webhook update_underwriting to receive a notification of the merchant’s underwriting status. Refer to our Webhook Documentation for instructions on setting up the webhook.
Step 7: Check the merchant’s account status
When the underwriting_status is “APPROVED,” you can poll the merchant record to view the merchant status.
To check the merchant account status, complete the following command:
GET /merchant/{id}Sample curl:
curl --location --request GET 'https://apiprod.fattlabs.com/merchant/merchant_id' \
--header 'Authorization: Bearer token' \
--header 'Accept: application/json'

//Return: merchant.status
Once the merchant status is “ACTIVE,” the account can begin processing payments using the API key.
Note: You can use the merchant’s merchant-level API key to subscribe to a webhook update_merchant_status and receive an update on the merchant status
Refer to our Webhook Documentation for instructions on setting up the Webhook.
Customizing the Merchant Enrollment
The white-labelled enrollment method allows you to customize and streamline the enrollment process for your merchants. This ability can improve successful sign-ups and reduce the need for intervention to help merchants complete the applications. Additionally, streamlining the application process can reduce errors and allow them to be easily corrected, resulting in quicker underwriting approvals.
You can control the ability to show or hide field values and pre-populating values that can be edited if required.

To hide all fields that are pre-populated, set the hide_prefilled_fields to true.
"hide_prefilled_fields": true
For additional flexibility, you can set each field parameter to a specific setting, allowing you to hide or show parameters and enable or disable editing.
Example:
"registration": {
  "field_permissions": {
    "business_dba": null, // The field will be hidden
    "business_website": 'read', // The field will be visible but read only
    "company_type": 'write' // The field will be visible and editable.
  }
}
Updated 9 days ago
