
Using Lightbox for Payments
Stax Lightbox is a fully compliant online payment solution that is highly customizable and seamlessly integrates into your website. It takes payment buttons to the next level.
Stax Lightbox (formerly known as Checkout) integrates seamlessly with your website to offer a beautifully designed, turnkey solution for online sales without customers ever having to leave your site. We simplify security by allowing your business to process and store cardholder data on our secure, PCI-compliant servers.
Implementing Stax Lightbox
Stax Lightbox can be added to your website by adding a minimum amount of code. In addition to the code block, you will need your web payments token, which identifies you so that the payments can be directed accordingly.
To add Stax Lightbox to your site, complete the following:
- In Stax pay, navigate to Apps > Checkout.
- Copy the checkout code which contains your web payment token.
- Paste the code into your website.
The div id value must be equal to data-button. If you change the main div id, you must ensure that the data-button variable is identical with a # before the name. For example, the above code sample uses pay_with_stax as the main div id. Therefore, the data-button field will be #pay_with_stax.
Stax Lightbox Customization
Your business is unique. Lightbox makes it easy to select the best options, whether that means keeping the lightbox short and simple for your customers or including additional fields.
Optional Configuration Variables
You can add optional fields to customize the Lightbox payment.
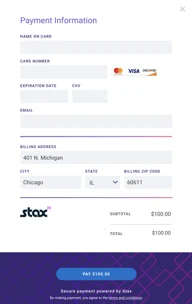
You can add a payment amount and billing address to the checkout flow. To produce an image above of the checkout, your code would look something like this:
<div id="pay_with_stax">
<!-- HTML is dynamically placed here -->
</div>
<script
id="stax_checkout_script"
src="https://checkout.staxpayments.com/v1/checkout.min.js"
data-webpaymentstoken="yoursystemgeneratedtoken"
data-button="#pay_with_stax"
data-billingEmail=""
data-amount="100.00"
data-billingInclude="true">
</script>
The following are acceptable parameters that can be added to the online checkout process:
Parameter | Description |
|---|---|
data-amount | The amount due is in USD; do not include currency symbols or commas in the amount. If data-amount is omitted or is 0, the customer will be required to manually enter an amount. |
data-name | Cardholder name that can be prefilled. |
data-billingInclude | If true, users will be requested but not required to enter their address, city, state, and zip code. If false or omitted, the billing fields will not be displayed. |
data-billingRequired | If true, users will be required to fill in all billing fields. Note that data-billingInclude must be true to display the billing fields. |
data-billingAddress1 | Billing address associated with the card. |
data-billingCity | The city associated with the card. |
data-billingState | Two letter abbreviation for the state. Note that the state will be used to determine if surcharging, if applicable, can be applied. |
data-billingZip | Zip code associated with the card. |
data-billingEmail | Prefilled email address. This is where a payment receipt will be sent. |
data-expDate | Card expiration date: MM/YY format required. |
data-openOnLoad | True or False. If true, Stax Lightbox will be loaded and displayed as soon as the JavaScript is executed instead of when the button is clicked. Stax recommends using the Pay with Stax button whenever possible. |
data-displayConfirmation | Boolean value that defaults to false. If set to true, it displays a confirmation modal after a successful transaction. Message displayed in the confirmation model: |
Updated 7 months ago